Effective Probing with SprutCAM
Probing is a process by which a CNC machine can be tested for accuracy. Probing involves using a probe to touch the surface of the material that is being cut by the CNC machine. The probe will then measure how deep it has penetrated into the material. This measurement is then used to calculate whether or not this particular cut was accurate enough for use in production.
The probe should be set at a certain height from the surface of the material and then moved across it, touching it at different points on its way across. This will help in measuring how deep each point on this surface is from where it intersects with other points on that surface and thereby calculating its accuracy level.
Measuring cycles can be used on lathe machines, milling machines, and robots. Measuring cycles allow you to determine the integrity of the tool, dimensions of parts, angles, and machining elements of the part. Due to this, you can get more correct machining and avoid errors. The main purpose of these cycles are listed below:
- control of the dimensions of critical surfaces of parts with output to the report
- measurement of a part to compensate for inaccuracies in the location of the part and the geometric dimensions of real parts
- measurement to detect inaccuracies in tool sizes
- tool breakage control
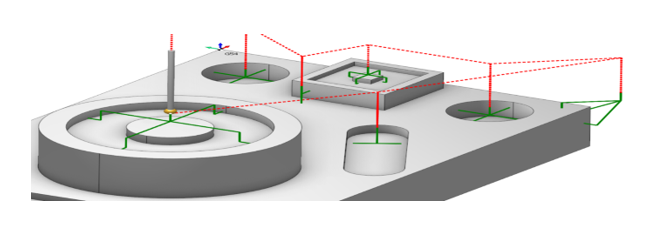
You can add a probing operation in the G-code program at the same time as other machining operations. The main task of the probing operation is to provide the CNC machine with actual data on the position of the workpiece and the condition of the tool.
It works as follows:
The system has special operations for creating a toolpath based on measuring cycles:
- Mill part probing
- Mill tool probing
- Turn part probing
- Turn tool probing
These operations are practically the same. It only overrides the default values for some parameters depending on the purpose of the operation (for example, a tool).
You can create your own probing cycles with individual properties for future use. New probing cycles may be stored in the library, which is a separate file with an extension. This library can be shared with other users.
How it works with a workpiece
CNC machines use special measuring equipment and canned cycles. When the cycle starts, the CNC machine swaps the tool for a special sensor and touches the workpiece with it. Thus, the CNC machine updates the data on the part location and parameters.
How it works with a tool
CNC machines use special measuring equipment and canned cycles. When the cycle starts, the CNC machine tool touches a special sensor. Thus, the CNC machine updates its data on the tool parameters.
For more information about SprutCAM Software and product inquiries, please contact us at https://nctools.com.au/ or call us on +61 3 8618 6884
NC Tools is the Australian and New Zealand distributor for SprutCAM. https://sprutcam.com/sprutcam/probing/


